Add the Elastic Beanstalk CDK
Add the Elastic Beanstalk CDK Dependencies
Next, we will create the Elastic Beanstalk application, application version, and environment so that we can deploy the web app that we just uploaded to S3 using S3 Assets.
- Add the dependency to the Elastic Beanstalk module for CDK at the top of the lib/eb-appln-stack.ts file.
import * as elasticbeanstalk from 'aws-cdk-lib/aws-elasticbeanstalk';
- Put this code under the code of the S3 Assets in the lib/eb-appln-stack.ts file. This code will create the application with the name MyWebApp in Elastic Beanstalk.
const appName = 'MyWebApp';
const app = new elasticbeanstalk.CfnApplication(this, 'Application', {
    applicationName: appName,
});
Create Elastic Beanstalk Application Version
Now we need to create an application version from the S3 asset that we created earlier.
- This piece of code will create the app version using the S3 bucket name and S3 object key that S3 Assets and CDK will provide to this method.
// Create an app version from the S3 asset defined earlier
const appVersionProps = new elasticbeanstalk.CfnApplicationVersion(this, 'AppVersion', {
    applicationName: appName,
    sourceBundle: {
        s3Bucket: webAppZipArchive.s3BucketName,
        s3Key: webAppZipArchive.s3ObjectKey,
    },
});
- Adding a dependency to make sure that the Elastic Beanstalk application exists before creating the app version.
// Make sure that Elastic Beanstalk app exists before creating an app version
appVersionProps.addDependency(app);
Create the Instance Profile
To create the Elastic Beanstalk environment, we will need to provide an existing instance profile name to pass role information to an Amazon EC2 instance when the instance starts.
- Import the IAM module dependency in the CDK stack we have been working on.
import * as iam from 'aws-cdk-lib/aws-iam';
- Creating the application version:
- The first thing the code does is to create a new IAM role (myRole).
- To allow the EC2 instances in our environment to assume the role, the instance profile specifies Amazon EC2 as a trusted entity in the trust relationship policy.
- To that role we then add the managed policy AWSElasticBeanstalkWebTier. We then create the instance profile with that role and the profile name.
// Create role and instance profile
const myRole = new iam.Role(this, `${appName}-aws-elasticbeanstalk-ec2-role`, {
    assumedBy: new iam.ServicePrincipal('ec2.amazonaws.com'),
});

const managedPolicy = iam.ManagedPolicy.fromAwsManagedPolicyName('AWSElasticBeanstalkWebTier')
myRole.addManagedPolicy(managedPolicy);

const myProfileName = `${appName}-InstanceProfile`

const instanceProfile = new iam.CfnInstanceProfile(this, myProfileName, {
    instanceProfileName: myProfileName,
    roles: [
        myRole.roleName
    ]
});
Create Elastic Beanstalk Environment
The last part we need to create is the Elastic Beanstalk environment. The environment is a collection of AWS resources running an application version. For the environment, we will need to give some information about the infrastructure.
- To define the configuration options, add the following lines of code:
// Example of some options which can be configured
const optionSettingProperties: elasticbeanstalk.CfnEnvironment.OptionSettingProperty[] = [
    {
        namespace: 'aws:autoscaling:launchconfiguration',
        optionName: 'IamInstanceProfile',
        value: myProfileName,
    },
    {
        namespace: 'aws:autoscaling:asg',
        optionName: 'MinSize',
        value: props?.maxSize ?? '1',
    },
    {
        namespace: 'aws:autoscaling:asg',
        optionName: 'MaxSize',
        value: props?.maxSize ?? '1',
    },
    {
        namespace: 'aws:ec2:instances',
        optionName: 'InstanceTypes',
        value: props?.instanceTypes ?? 't2.micro',
    },
];
- Add following code in the stack definition file lib/eb-appln-stack.ts:
// Create an Elastic Beanstalk environment to run the application
const elbEnv = new elasticbeanstalk.CfnEnvironment(this, 'Environment', {
    environmentName: props?.envName ?? "MyWebAppEnvironment",
    applicationName: app.applicationName || appName,
    solutionStackName: 'SOLUTION-STACK-NAME',
    optionSettings: optionSettingProperties,
    versionLabel: appVersionProps.ref,
});
- Replace SOLUTION-STACK-NAME with Latest Supported Solution Stack Name here. At this time, latest version is
64bit Amazon Linux 2023 v6.0.2 running Node.js 18.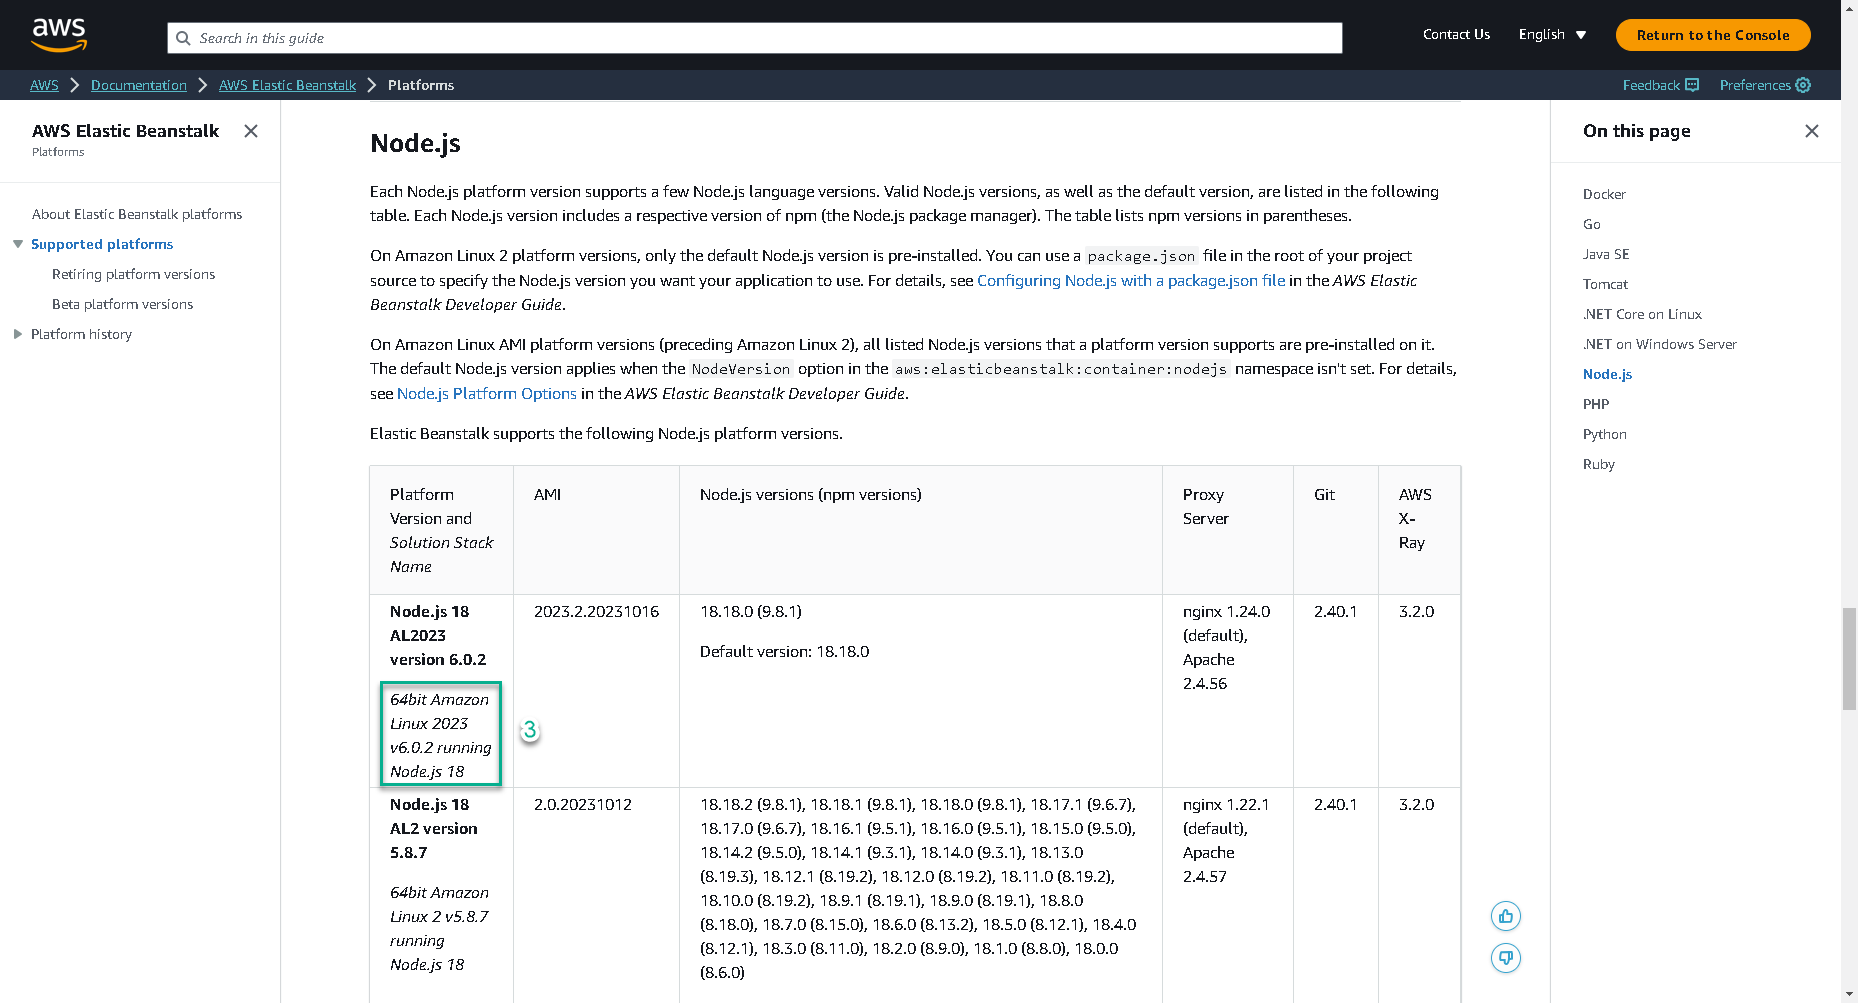
Finally, source code of file lib/eb-appln-stack.ts is below:
import * as cdk from 'aws-cdk-lib';
import { Construct } from 'constructs';
// Add import statements here
import * as s3assets from 'aws-cdk-lib/aws-s3-assets';
import * as elasticbeanstalk from 'aws-cdk-lib/aws-elasticbeanstalk';
import * as iam from 'aws-cdk-lib/aws-iam';
export interface EBEnvProps extends cdk.StackProps {
    // Autoscaling group configuration
minSize?: string;
maxSize?: string;
instanceTypes?: string;
envName?: string;
}

export class EBApplnStack extends cdk.Stack {
constructor(scope: Construct, id: string, props?: EBEnvProps) {
    super(scope, id, props);

    // The code that defines your stack goes here
    // Construct an S3 asset Zip from directory up.
    const webAppZipArchive = new s3assets.Asset(this, 'WebAppZip', {
    path: `${__dirname}/../src`,
    });

    const appName = 'MyWebApp';
    const app = new elasticbeanstalk.CfnApplication(this, 'Application', {
        applicationName: appName,
    });

    // Create an app version from the S3 asset defined earlier
    const appVersionProps = new elasticbeanstalk.CfnApplicationVersion(this, 'AppVersion', {
    applicationName: appName,
    sourceBundle: {
        s3Bucket: webAppZipArchive.s3BucketName,
        s3Key: webAppZipArchive.s3ObjectKey,
    },
    });

    // Make sure that Elastic Beanstalk app exists before creating an app version
    appVersionProps.addDependency(app);

    // Create role and instance profile
    const myRole = new iam.Role(this, `${appName}-aws-elasticbeanstalk-ec2-role`, {
        assumedBy: new iam.ServicePrincipal('ec2.amazonaws.com'),
    });

    const managedPolicy = iam.ManagedPolicy.fromAwsManagedPolicyName('AWSElasticBeanstalkWebTier')
    myRole.addManagedPolicy(managedPolicy);

    const myProfileName = `${appName}-InstanceProfile`

    const instanceProfile = new iam.CfnInstanceProfile(this, myProfileName, {
        instanceProfileName: myProfileName,
        roles: [
            myRole.roleName
        ]
    });

    // Example of some options which can be configured
    const optionSettingProperties: elasticbeanstalk.CfnEnvironment.OptionSettingProperty[] = [
        {
            namespace: 'aws:autoscaling:launchconfiguration',
            optionName: 'IamInstanceProfile',
            value: myProfileName,
        },
        {
            namespace: 'aws:autoscaling:asg',
            optionName: 'MinSize',
            value: props?.maxSize ?? '1',
        },
        {
            namespace: 'aws:autoscaling:asg',
            optionName: 'MaxSize',
            value: props?.maxSize ?? '1',
        },
        {
            namespace: 'aws:ec2:instances',
            optionName: 'InstanceTypes',
            value: props?.instanceTypes ?? 't2.micro',
        },
    ];

    // Create an Elastic Beanstalk environment to run the application
    const elbEnv = new elasticbeanstalk.CfnEnvironment(this, 'Environment', {
        environmentName: props?.envName ?? "MyWebAppEnvironment",
        applicationName: app.applicationName || appName,
        solutionStackName: '64bit Amazon Linux 2023 v6.0.2 running Node.js 18',
        optionSettings: optionSettingProperties,
        versionLabel: appVersionProps.ref,
    });

}
}